To give yourself the best chance of benefitting from See Your Breathing we strongly recommend that you go through each of the steps on this page.
We will show you how to
We will show you how to
- Use See Your Breathing
- Document systematically
- Kickstart your exploration
How to Use See Your Breathing
Background Noise
You start by recording the background noise. Then you will record your breathing and practice making groups of three recordings until your breathing settles into a pattern.
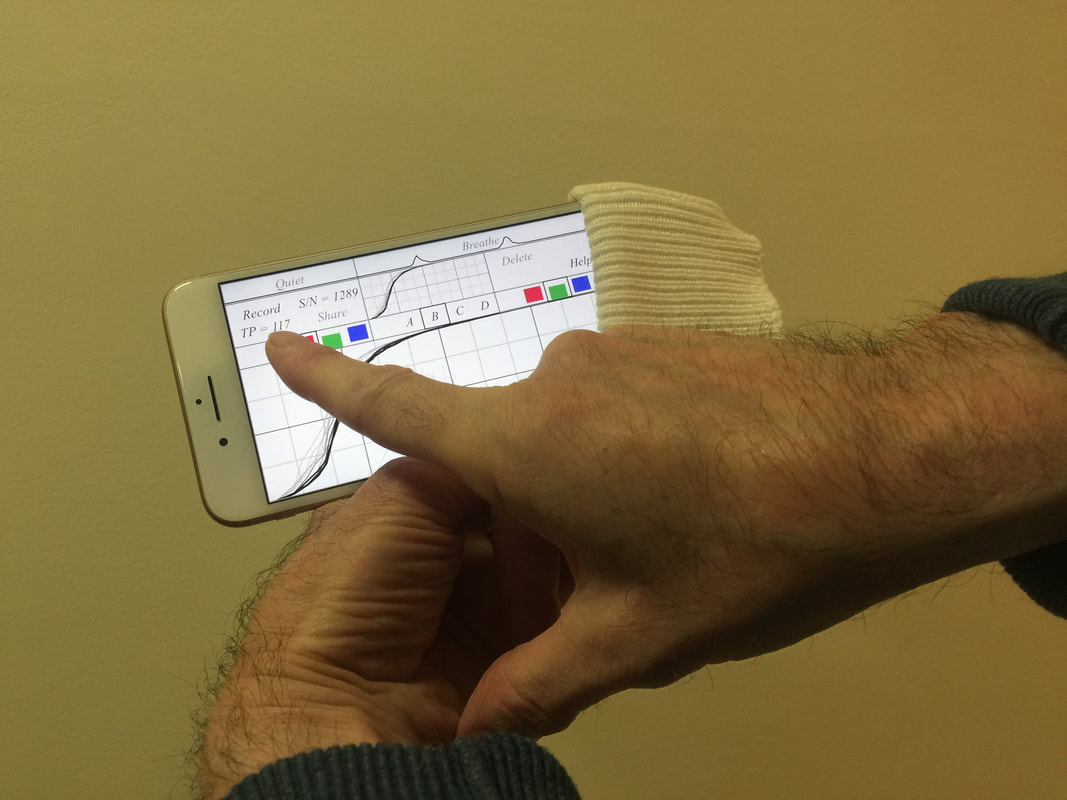
Tap the word ‘Record’.
Tap the word ‘Record’.
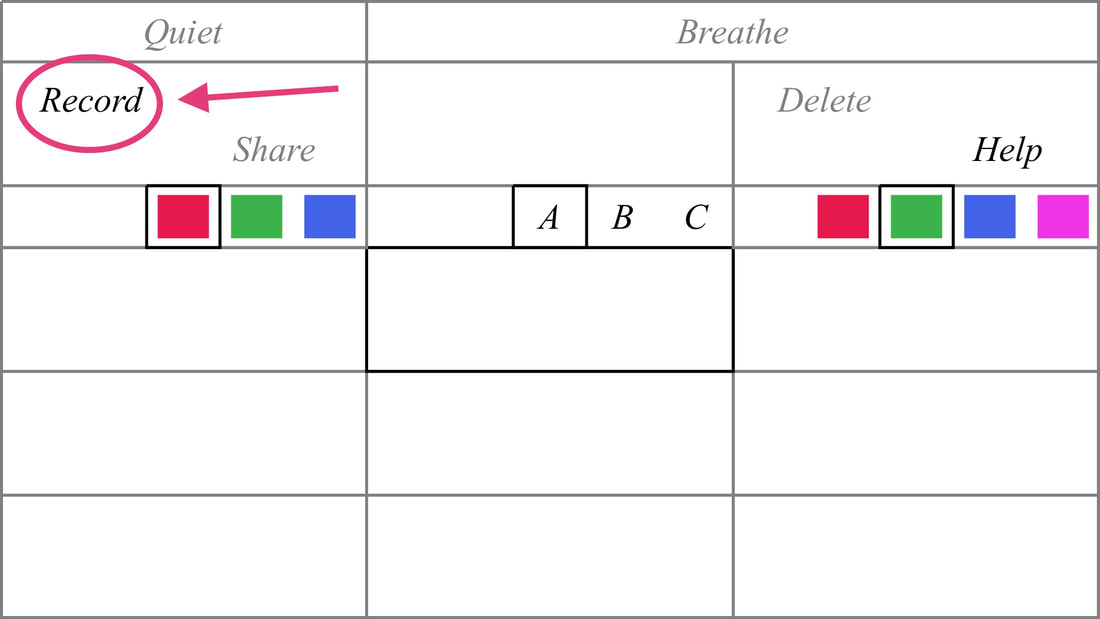
Allow See Your Breathing to access the microphone. Reinstall See Your Breathing if you accidentally refuse access.
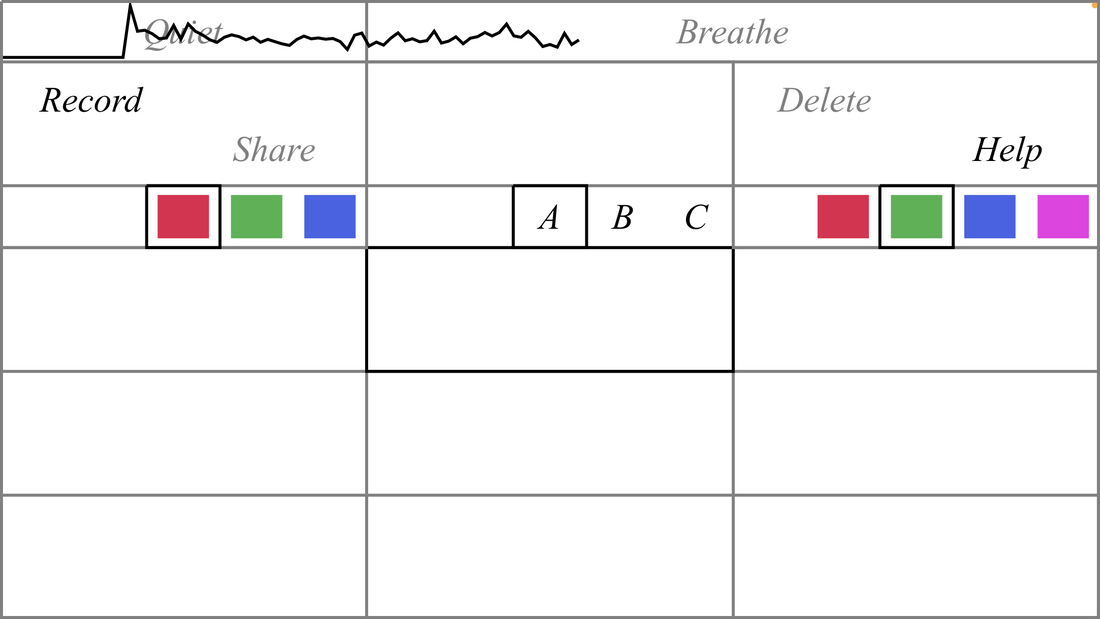
Watch the Timeline grow across the top of the screen while being quiet.
The Timeline plots the volume (power) of your breathing against time over the fifteen-second recording interval.
Watch the Timeline grow across the top of the screen while being quiet.
The Timeline plots the volume (power) of your breathing against time over the fifteen-second recording interval.
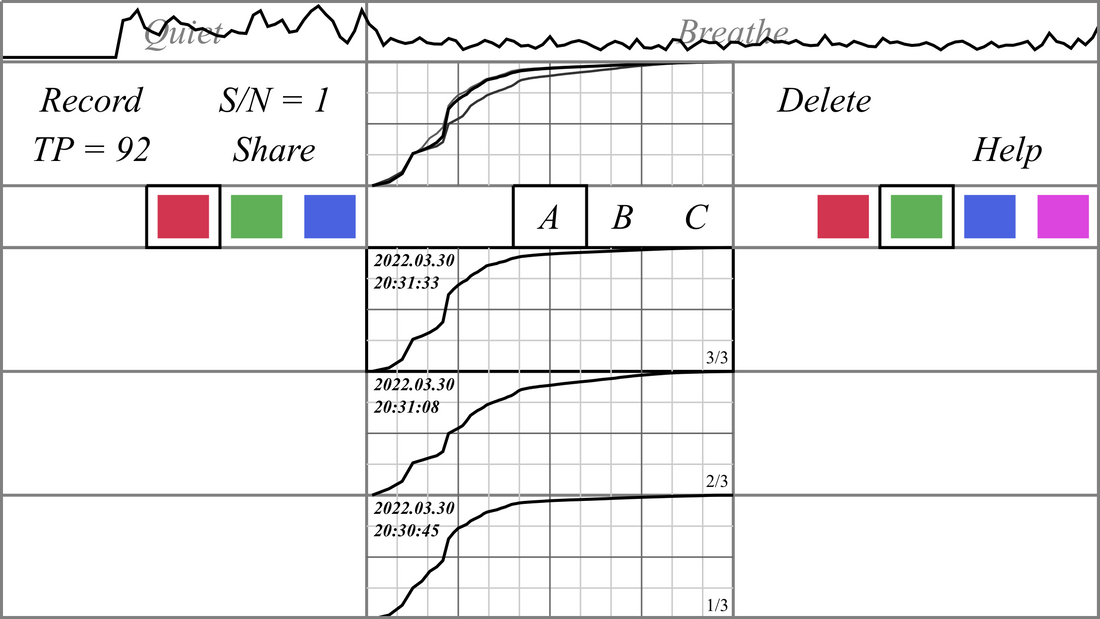
The recording curve (recording) is then shown in the list of recordings in the middle column and in the composite graph in the top center.
The recording plots the accumulated power against the frequency for the last ten seconds of the recording.
You can see a large copy of this small composite graph by tapping it. The large copy will appear in the lower portion of the screen where the columns of small graphs are otherwise.
To return to the columns of small graphs tap the small composite graph again and they will reappear.

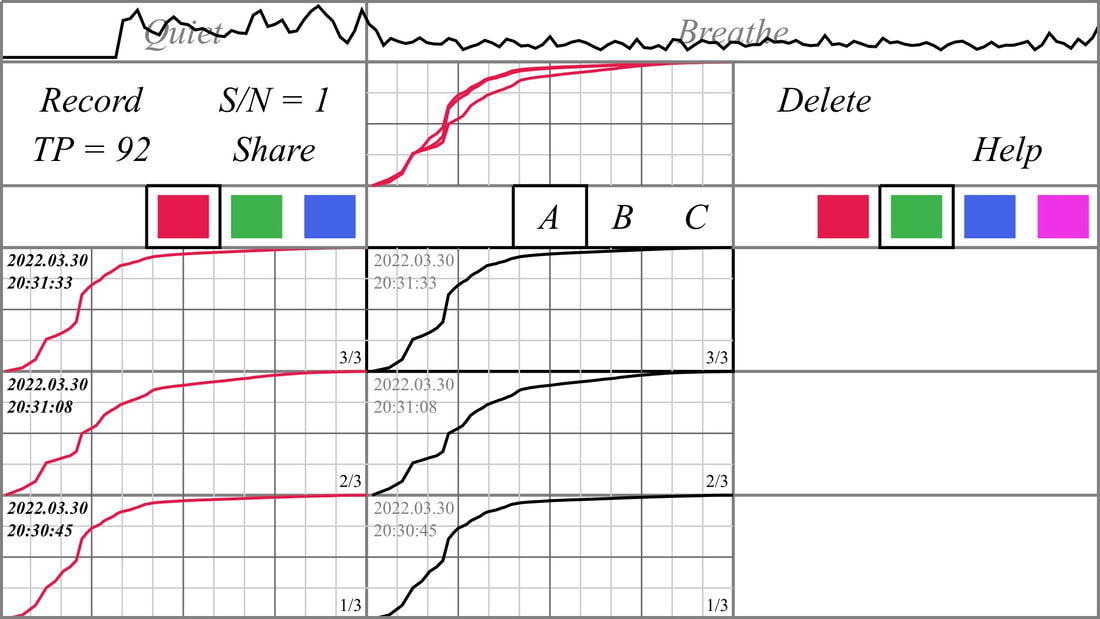
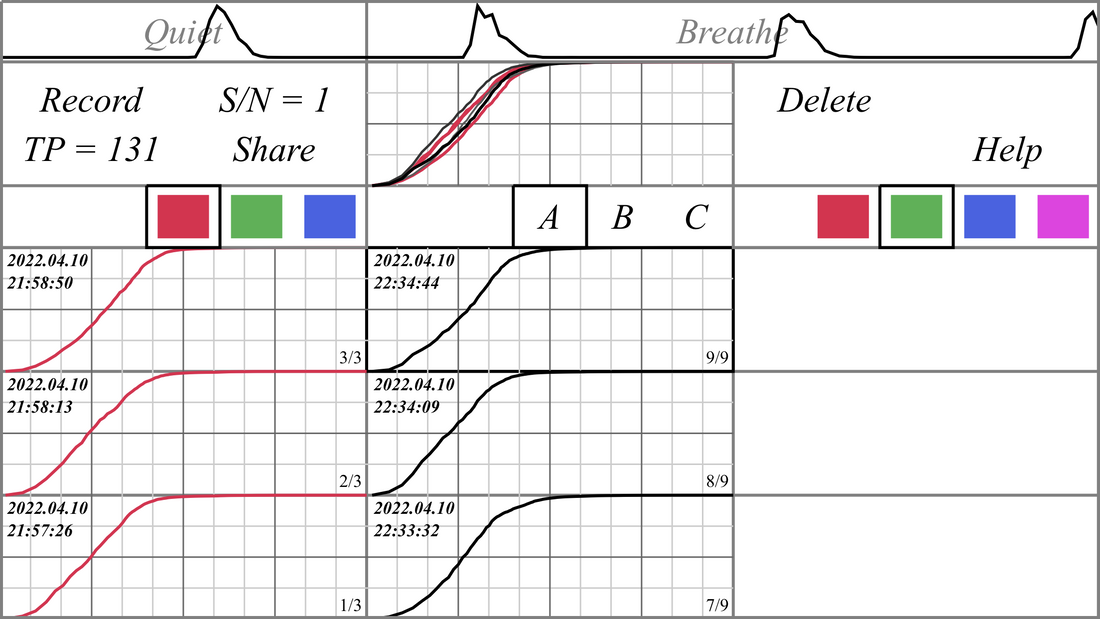
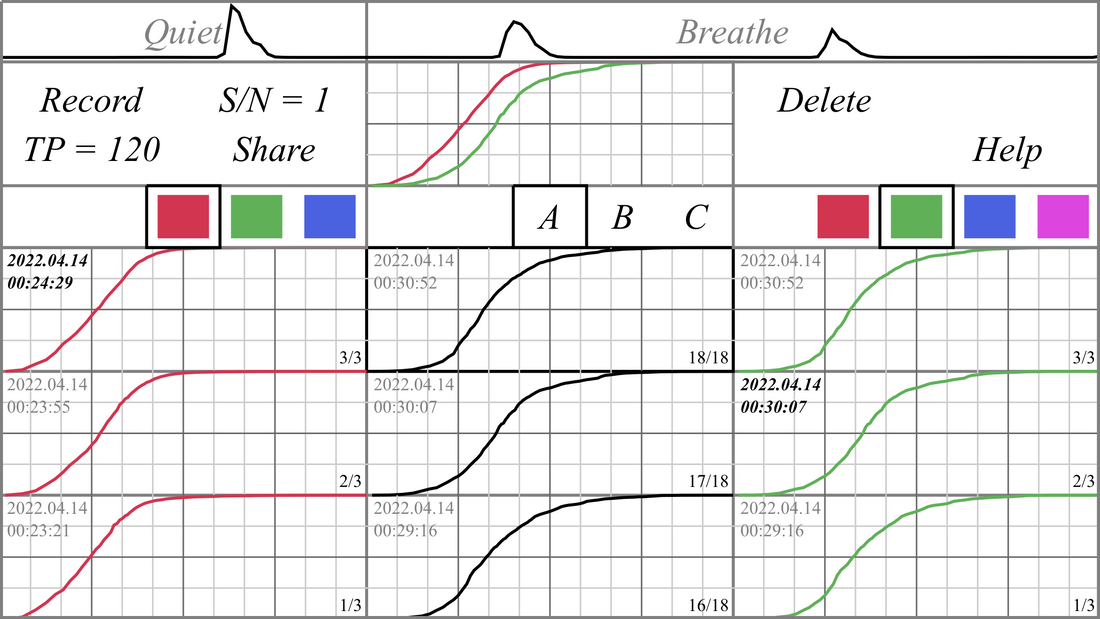
The lists of recordings that appear in the three columns are scrollable by swiping up or down. The recording at the top of the center list is the ‘selected’ recording and has its timeline showing along with its Total Power (TP) and its Signal to Noise Ratio (S/N). It is the recording to which the Share and Delete commands apply.
Take a screenshot. We highly recommend taking a screenshot after each recording and after each change in the display so that you can look over what you have done in a dedicated album in Photos.
Take a screenshot. We highly recommend taking a screenshot after each recording and after each change in the display so that you can look over what you have done in a dedicated album in Photos.
The TP (Total Power) measurement tells you the total power that you have recorded over the last 10 seconds of the recording.
Consider the possible noises that you can eliminate and make two more recordings of the background noise. Check the Total Power and take a screenshot after each.
We recommend consistently making recordings in groups of three repetitions.
Consider the possible noises that you can eliminate and make two more recordings of the background noise. Check the Total Power and take a screenshot after each.
We recommend consistently making recordings in groups of three repetitions.
Note the TP value of the last background recording.
The Total Power uses a scale where an increase of 10 points corresponds to 10 times greater power, and an increase of 15 points corresponds to 30 times greater power.
As you practice making recordings of your breathing you will try to achieve a TP value at least 15 points higher than this background TP value.
If you accomplish this 15 point gap and if the background noise does not increase when you record your breathing, then the sound of your breathing will be 30 times the background noise.
Swipe the top recording to the left.
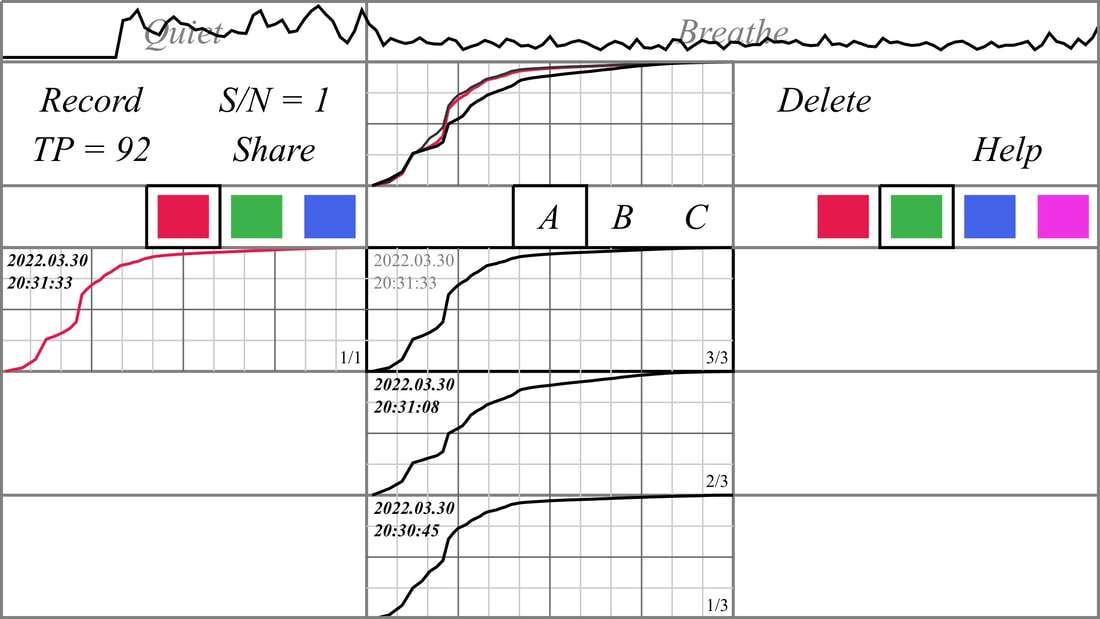
Note that the top recording is now part of the red color group shown in the left column. This recording is colored red in the composite graph indicating that it belongs to the red group.
The Total Power uses a scale where an increase of 10 points corresponds to 10 times greater power, and an increase of 15 points corresponds to 30 times greater power.
As you practice making recordings of your breathing you will try to achieve a TP value at least 15 points higher than this background TP value.
If you accomplish this 15 point gap and if the background noise does not increase when you record your breathing, then the sound of your breathing will be 30 times the background noise.
Swipe the top recording to the left.
Note that the top recording is now part of the red color group shown in the left column. This recording is colored red in the composite graph indicating that it belongs to the red group.
Swipe each of the other two background recordings to the left.
Breathing
There are three steps to making a recording of your breathing.
Step 1.
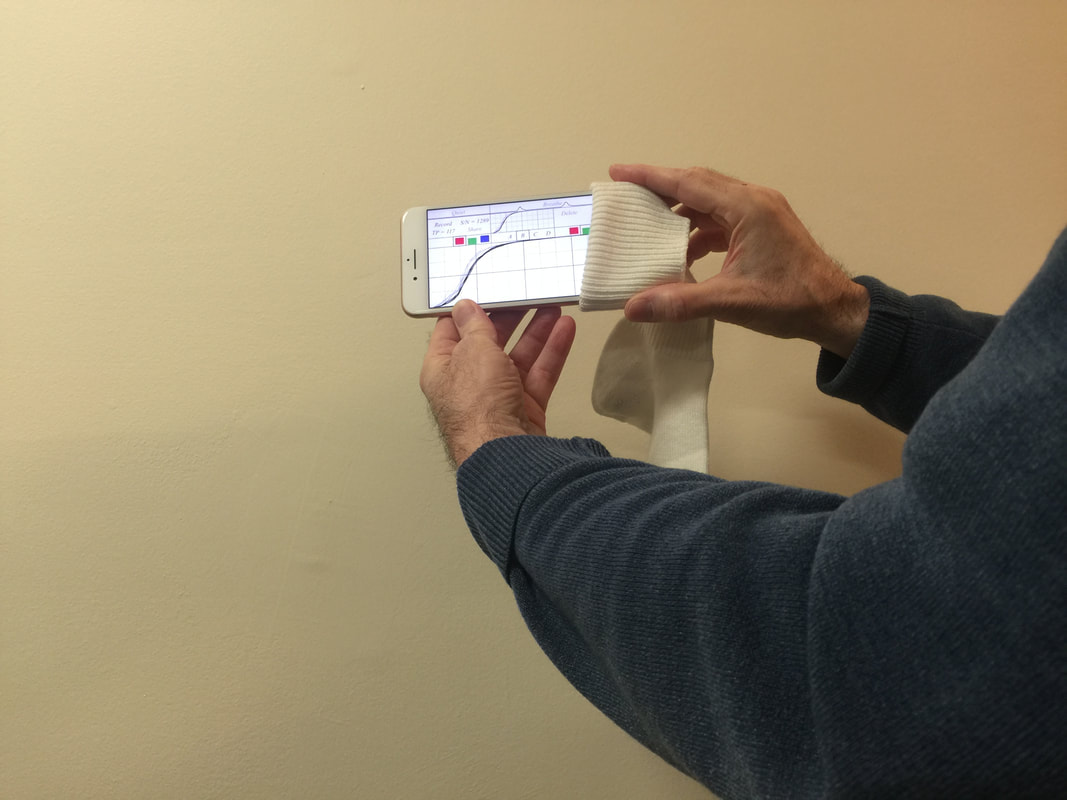
Put a sock on the microphone end of the iPhone to reduce the wind noise.
(On an iPad or Mac use an external microphone with a foam wind muff.)
Step 1.
Put a sock on the microphone end of the iPhone to reduce the wind noise.
(On an iPad or Mac use an external microphone with a foam wind muff.)
Step 2.
Tap the word ‘Record’.
Tap the word ‘Record’.
Step 3.
When the fifteen second recording is completed, the iPhone will vibrate.
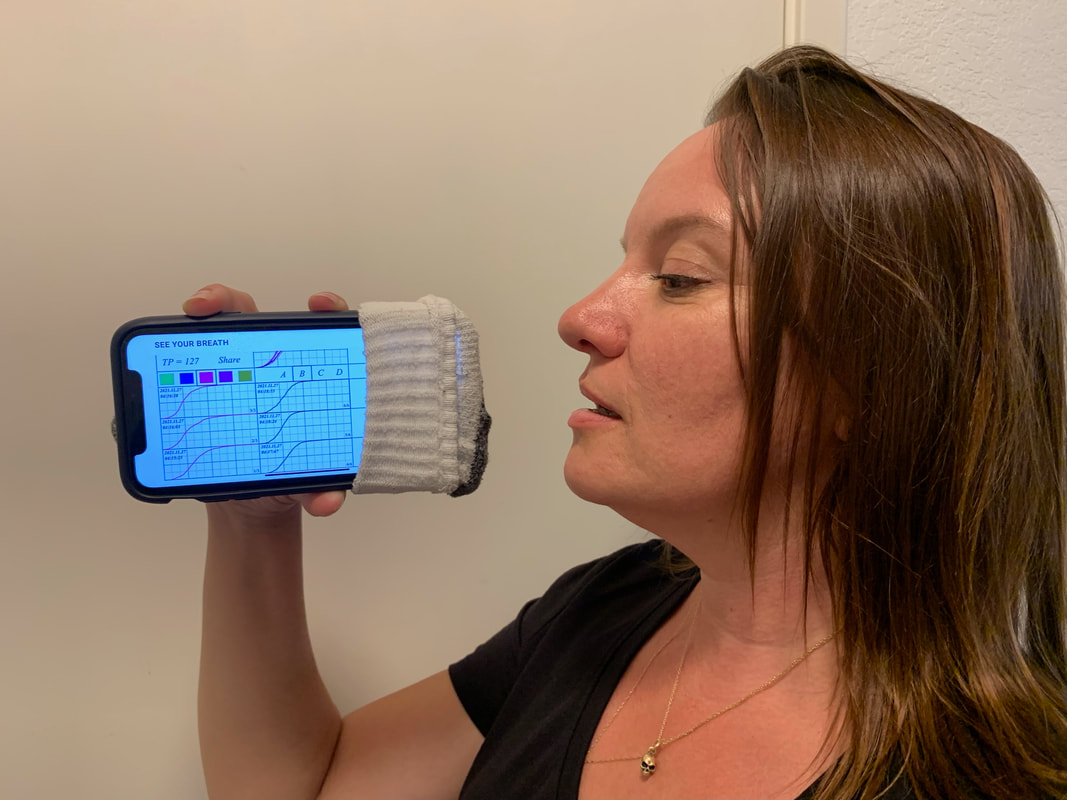
- Turn the sock-covered microphone end of the phone to point straight towards your mouth.
- Hold it about one inch away from your mouth.
- Breathe in and out deeply and purposefully with your mouth relaxed. (Do not purse your lips as if you were about to whistle.)
When the fifteen second recording is completed, the iPhone will vibrate.
Note the TP value to see if it is at least 15 points higher than the TP value for the background noise.
Observe that the middle column shows the fourth, third, and second recording out of the four recordings made so far. This is indicated by the notations 4/4, 3/4, and 2/4 in the lower right corners.
Observe that the middle column shows the fourth, third, and second recording out of the four recordings made so far. This is indicated by the notations 4/4, 3/4, and 2/4 in the lower right corners.

Make two more recordings of your breathing to complete a group of three repetitions.
Rest between repetitions if you feel strained so that your exertion does not change your subsequent breathing sounds.
Be sure to take a screenshot after each recording so you can review the TP values and timelines in Photos.
Rest between repetitions if you feel strained so that your exertion does not change your subsequent breathing sounds.
Be sure to take a screenshot after each recording so you can review the TP values and timelines in Photos.

Now you will replace the three background recordings in the red group at the left with the three recordings of your breathing.
Swipe each of the background recordings in the left column to the left. This will remove them from the red color group.
Take a screenshot to preserve this clear picture of the first three recordings of your breathing.
Swipe each of the background recordings in the left column to the left. This will remove them from the red color group.
Take a screenshot to preserve this clear picture of the first three recordings of your breathing.

Swipe each of the three recordings of your breathing left into the red color group.
Take a screenshot so that you can review these steps.
Take a screenshot so that you can review these steps.

Practice
Now you are ready to make three more recordings.
The aim is to settle into a consistent pattern of breathing (how close to hold the iPhone, how deep to breathe in, how hard to breathe out, and how to hold your mouth relaxed) that has the TP value at least 15 points higher than the TP value for the background noise.
The more you can remove variations due to the way in which you record the more the recordings will reveal changes in the condition of your lungs.

When the second set of three repetitions of your breathing is complete, swipe the first three out of the red color group and take a screenshot.

Swipe the second three into the red color group.

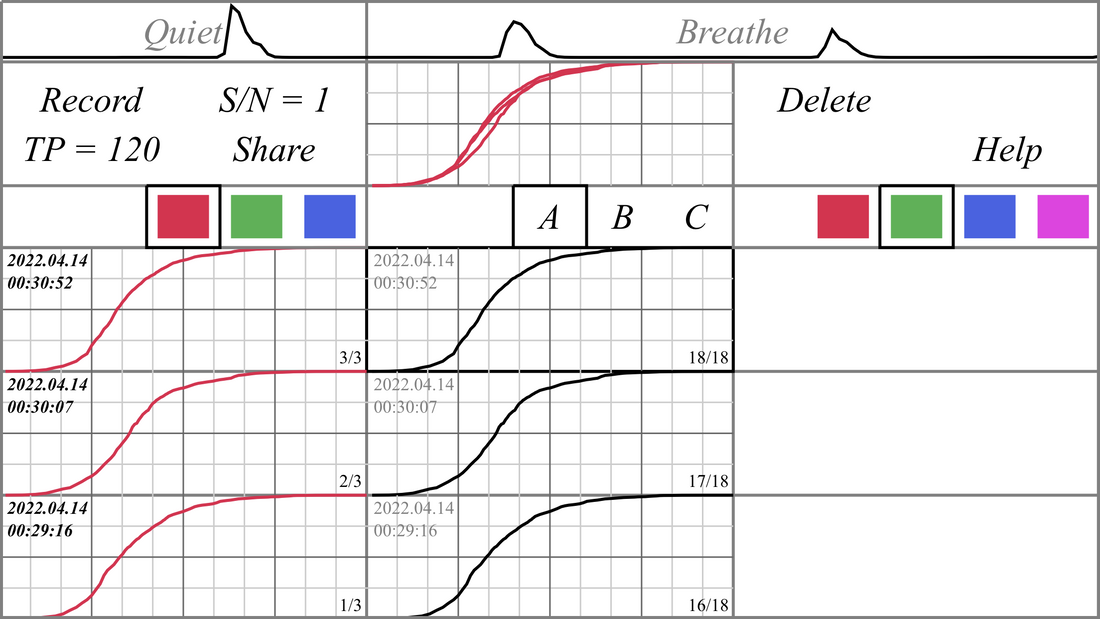
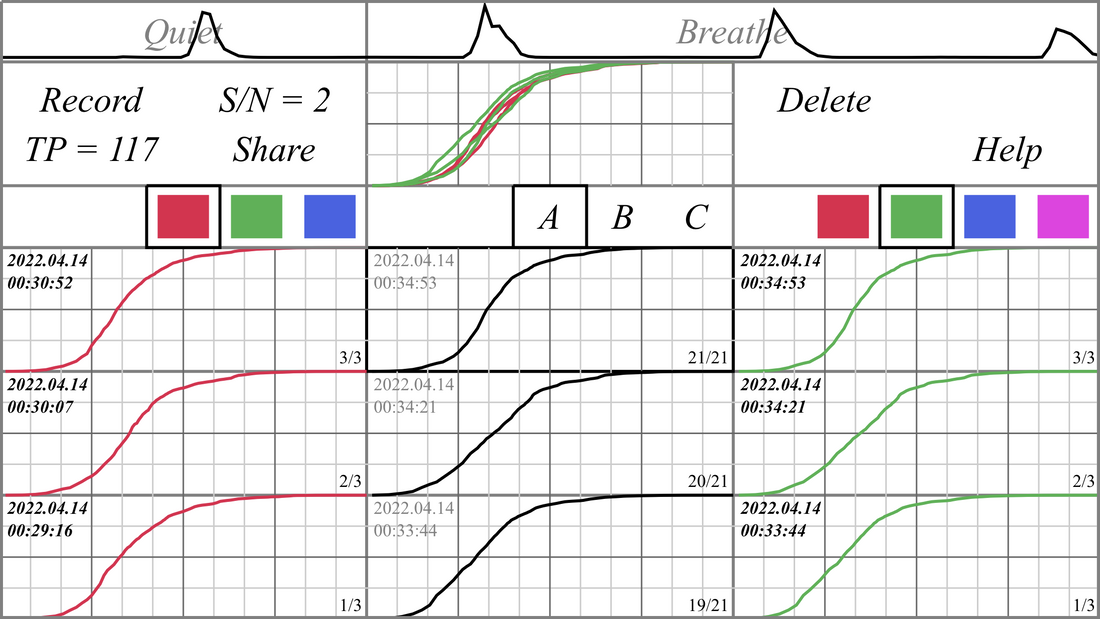
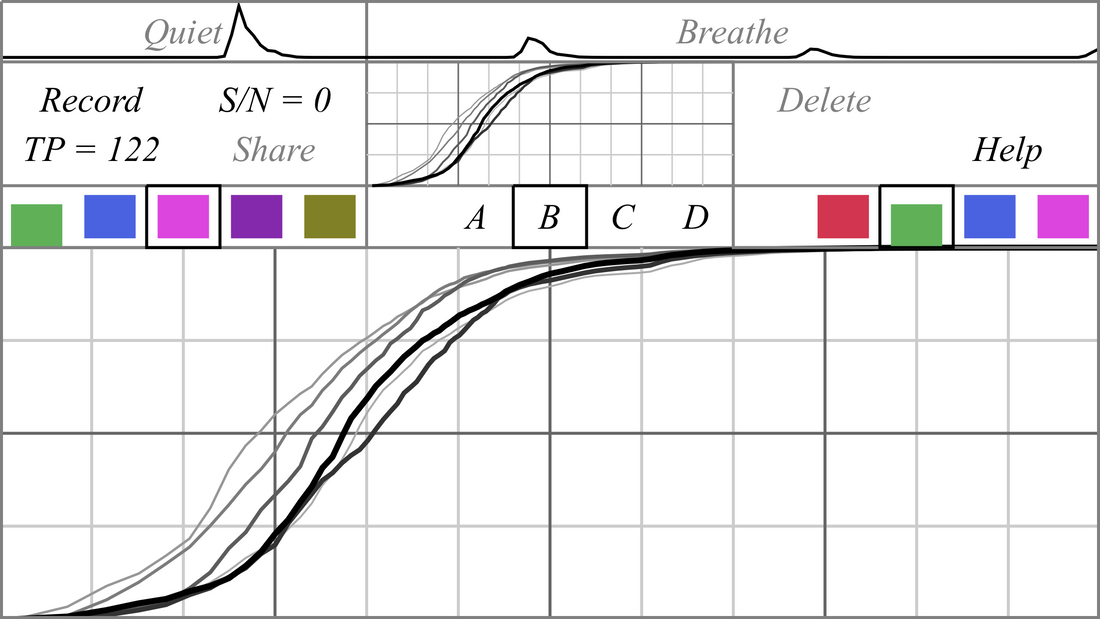
Notice how this method of clearing out the red group, moving the next group of three repetition into the red group, and then making three new recordings gives you a clean view in the composite graph of the last two groups of three repetitions.
The previous group of three repetitions is drawn in red and the most recent group of three repetitions is drawn in shades of gray. This is shown in the screenshot below which repeats the first screenshot of this section.
The previous group of three repetitions is drawn in red and the most recent group of three repetitions is drawn in shades of gray. This is shown in the screenshot below which repeats the first screenshot of this section.
Continue making groups of three recordings in this manner until you see that your breathing has settled into a pattern.
Note the amount of variation in your recordings done towards the end of this startup session. This prepares you to recognize a change in the recordings that is sufficiently large to be evidence of a change in your lungs.
Note the amount of variation in your recordings done towards the end of this startup session. This prepares you to recognize a change in the recordings that is sufficiently large to be evidence of a change in your lungs.
Document Systematically
Draw or Write on Your Screenshots with Markup

Show the large version of the composite graph by tapping the small composite graph.
Tapping it again will bring you back to the lists of recordings.
Tapping it again will bring you back to the lists of recordings.

Take a screenshot and tap the postage stamp version of the screenshot that temporarily shows up in the lower left corner.
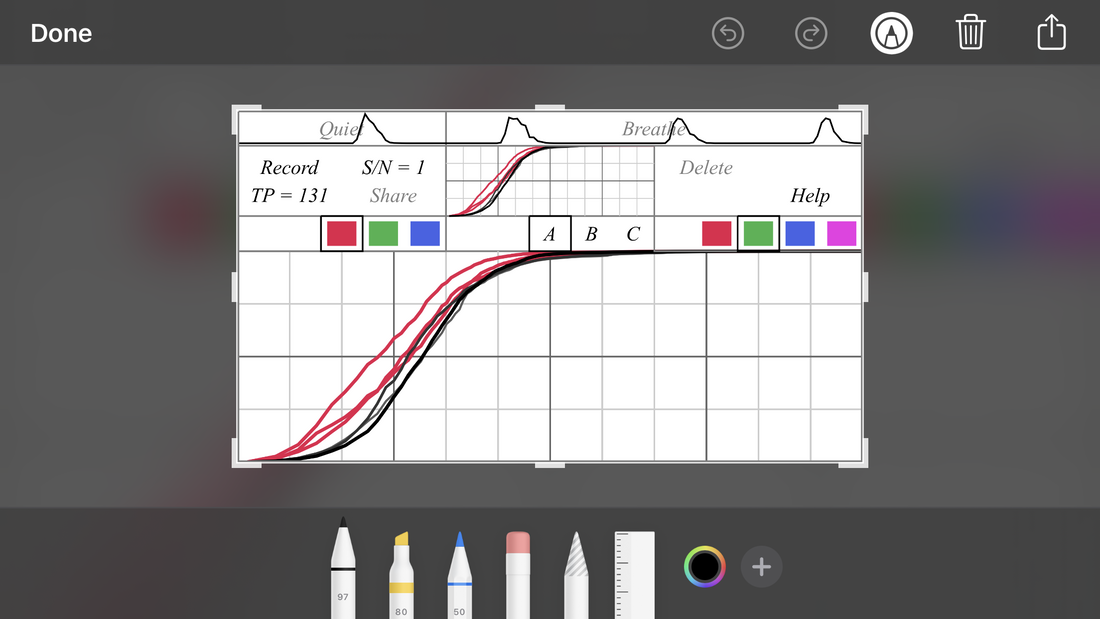
Now you can use Markup to add text and drawings to the screenshot that describe what you just did and your observations.

The lower right corner or the upper left corner are usually free of the recordings and so these are good places to put your documentation.
Here is one of many video tutorials on the Markup feature.
Here is one of many video tutorials on the Markup feature.

What to Document
The timeline, TP value, and the date and time of each recording is documented by the screenshots that you take after each recording while showing the lists of recordings.
A collection of recordings done with a purpose can be documented with an annotated large composite graph.
You should describe the significance of the different colors, the conditions (external and internal) you were in for each group of three repetitions, and what happened between successive groups of three.
Organize with Pictures
Include in your Photos album an image from the internet or a snapshot of something in your surroundings that will remind you what this session was about. Add a title with Markup.
This will make it easy to recognize your experiences in your See Your Breathing Photos album.
The gallery below shows the recordings made while following the instructions at the top of this page for how to use See Your Breathing.


When you review your screenshots in your See Your Breathing album you will learn what information you wished you had included in the documentation. You can augment your documentation with Markup and resolve to include such information contemporaneously the next time.
Kickstart Your Exploration
You are going to make See Your Breathing recordings before and after a remedy, such as a yoga session, and lay down some benchmarks for future reference. You will draw conclusions about how recordings of good breathing and not-so-good breathing look, how effective your favorite remedy is, and when you could profit from applying this remedy.
Before-and-After Experiment
To do a before-and-after experiment you make three ‘before’ recordings of your breathing and put them into the red color group before you do something that may change the condition of your lungs.
Since you have just made three recordings as part of your initial practice we can use them as the ‘before’ recordings. So clear the previous set of three recording from the red color group and put the last three recordings into the red color group.
Since you have just made three recordings as part of your initial practice we can use them as the ‘before’ recordings. So clear the previous set of three recording from the red color group and put the last three recordings into the red color group.
Next apply a home remedy that has helped you in the past, such as a breathing exercise, meditation, or use of a humidifier.
After you have completed your home remedy session make three more recordings.
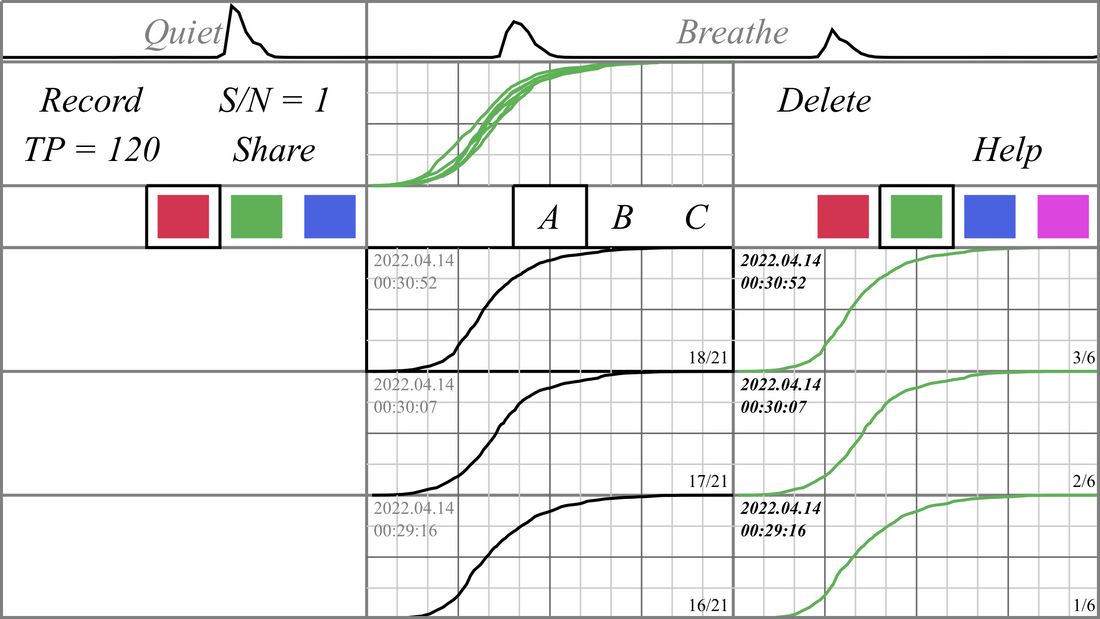
Put the three ‘after’ recording into the green color group by swiping them to the right.
Is there a difference between the ‘before’ and ‘after’ recordings?
There is a difference –
There is a difference –

If the ‘after’ recordings are different from the ‘before’ recordings, then show just one representative red recording in the composite graph and call it your ‘current worst’ recording. (Toggle a recording in or out of the composite graph by tapping on the date and time.)

Show one representative green recording in the composite graph and call it your ‘current best’ recording.
You can change which color groups are displayed in the left and right columns by scrolling the color swaths left or right with a swiping gesture. If you use red for your ‘current worst’ you may wish to use another color for the preceding set of three repetitions.
In this case where there is a clear difference between the ‘before’ and ‘after’ recordings, you have learned that the remedy that you applied made a difference and you are encouraged to use it even when feeling good.
In this case where there is a clear difference between the ‘before’ and ‘after’ recordings, you have learned that the remedy that you applied made a difference and you are encouraged to use it even when feeling good.
There is no difference –
If on the other hand, the ‘after’ recordings are essentially the same as the ‘before’ recordings, remove the red ‘before’ recordings by swiping them towards the edge of the iPhone.
Scroll the middle list to the ‘before’ recordings by swiping up until you see the three ‘before’ recordings.
Scroll the middle list to the ‘before’ recordings by swiping up until you see the three ‘before’ recordings.

Tap their date and time displays to mark them to be shown in the composite graph and then swipe them into the green color group.
Now select two green recordings to show in the composite graph as benchmarks representing the extremes of your current range of typical recordings.

Depending on how you judge your current breathing, these recordings may be typical for excellent, good, so-so, poor, or bad breathing.
Your follow-up recordings may confirm, modify or contradict these tentative conclusions, but setting them out as described above gets you started at collecting useful information.
Perhaps there was no change because you are at your optimum.
Or perhaps a different remedy would make a change.
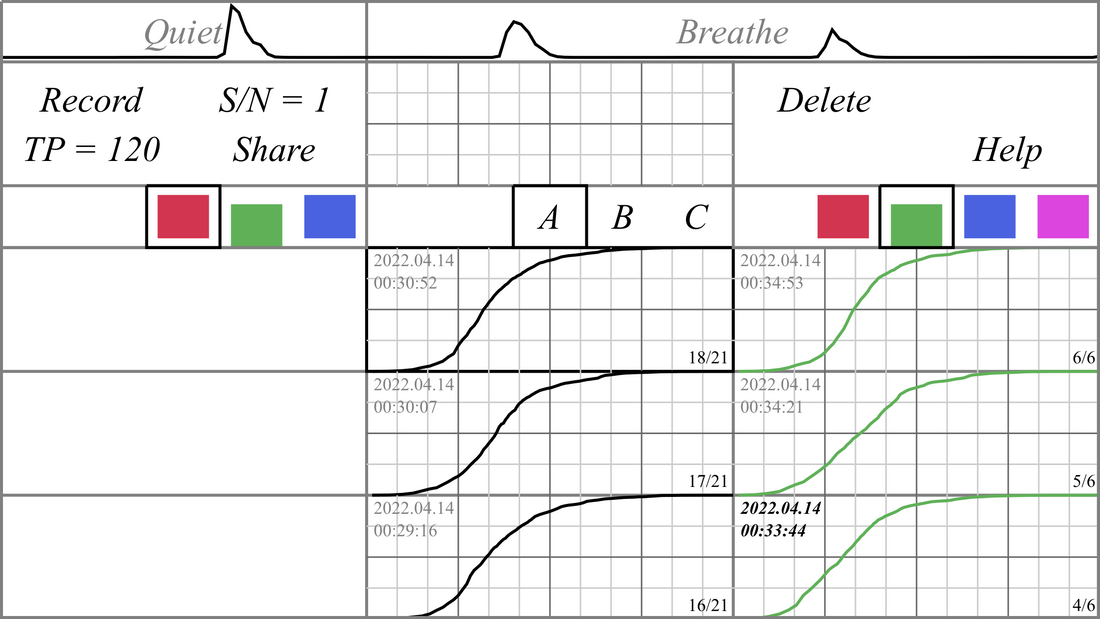
You can show all the green recordings by swiping the green color swath up, which temporarily signals See Your Breathing to consider all of them marked for inclusion in the composite graph.

By pushing the green color swath back down to the middle position See Your Breathing returns to where only the selected green recordings (date and time displayed in bold italics) are included in the composite graph.
Pushing the green color swath down to the low position will signal See Your Breathing to temporarily consider all the green recordings as not marked for inclusion in the composite graph.
Pushing the green color swath down to the low position will signal See Your Breathing to temporarily consider all the green recordings as not marked for inclusion in the composite graph.
This feature allows you to quickly compare your new recordings to all the green recordings or just the selected green recordings. You may also look at your new recordings free of the clutter of your green recordings. Take lots of screenshots so that you can peruse alternate presentations in your See Your Breathing album.
This feature also works for the middle column by pushing the current letter in the middle up or down.
When the same recording is considered included into the composite graph with different colors, then it is drawn multiple times offset a little with the different colors.
The 26 letters at the top of the middle column are a scrollable list of 26 people and/or situations.
When a letter not in the middle is pushed up, all of its recordings are temporarily considered to belong to the selected letter in the middle. This allows you to compare recordings collected under different letters.
If you are quiet during the first five seconds or a recording while the timeline is in the Quiet section, then the Signal to Noise Ratio (S/N) will show the ratio of the average power in the last ten seconds (Breathe section) to the average power in the first five seconds (Quiet section).
Framework for Understanding
We regularly view a new situation against a background of previous experiences. In See Your Breathing, your previous recordings become the literal background for new recordings. This background is a framework for understanding your new recordings.
We organize and annotate this background to make it more useful.
We organize and annotate this background to make it more useful.
Shades of Gray
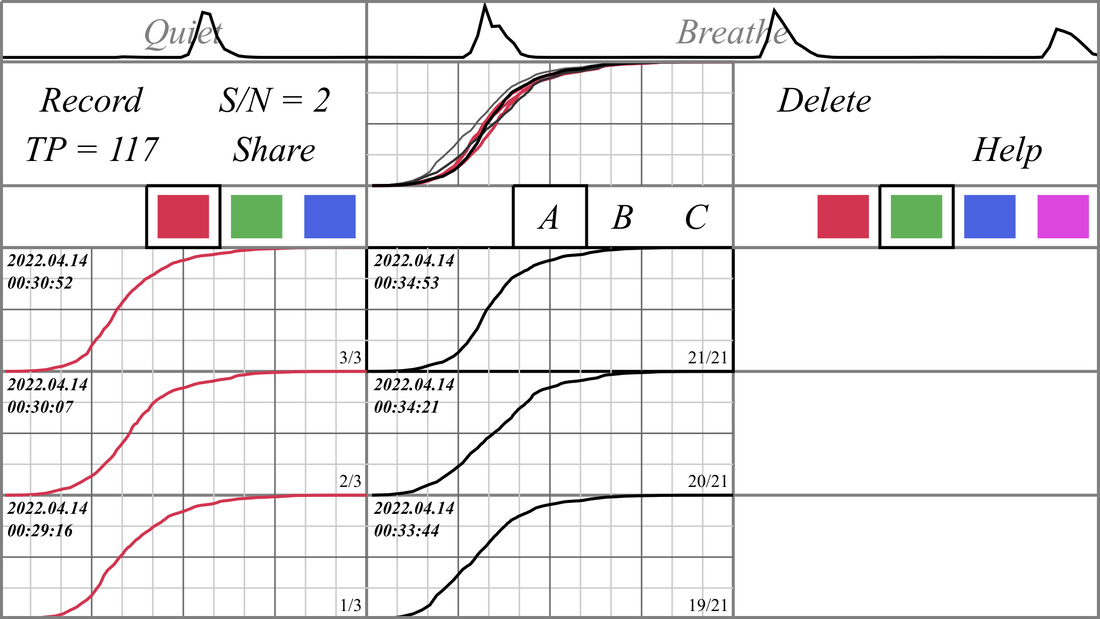
The newest recording is shown in black with the thickest line. The previous recordings are shown in lighter and lighter shades of gray with thinner and thinner lines. The most recent six recordings are all different but after that there is no more change.
The newest recording is shown in black with the thickest line. The previous recordings are shown in lighter and lighter shades of gray with thinner and thinner lines. The most recent six recordings are all different but after that there is no more change.
Color Groups
As shown earlier, you can use color groups to designate the ‘before’ and ‘after’ recordings for some remedy or trigger to more easily compare them.
Benchmarks
The benchmarks we laid down give a succinct reminder of today’s observations when observing new recordings.
Photos App
In Photos you can review all the screenshots of your recordings.
The slick blowup feature of Photos allows you to zoom in to see details and out to see multiple screenshots.
The folders, albums, favorites, and key words features give you the power to sort out and organize the screenshots.
The Markup feature lets you annotate the screenshots with text, arrows, circles, and magnifying glasses.
A Well Developed Framework for Understanding
Shades of gray, color groups, benchmarks, and the Photos app help make your previous recordings an organized body of information from which to draw useful conclusions and a well developed framework for understanding new recordings.
Shades of gray, color groups, benchmarks, and the Photos app help make your previous recordings an organized body of information from which to draw useful conclusions and a well developed framework for understanding new recordings.
We Welcome Your Ideas and Observations
This Getting Started page is a distillation of what we learned from a six month exploratory study working with 28 asthmatic individuals.
Your experience may lead you to extend and improve upon these suggestions, or completely replace them with something that works better for you.
We encourage you to share your discoveries about this tool and about controlling asthma with us so that we may include them with attribution to you on SeeYourBreath.com.
Disclaimer: The app is for informational purposes only. The app is no substitute for professional medical advice, diagnosis, treatment or emergency intervention or transmission of time-critical data. Users should always seek the advice of their healthcare providers for any questions regarding their medical condition. You agree that the app should not be used to make medical decisions. Users should never disregard professional medical advice or delay in seeking it because of information provided via the app.